Tuesday, June 26, 2012

One pillow, two pillow, three...


Been working on the front entry lately.  Went three times to IKEA to get a rug that THEIR WEBSITE said they had, but NO.  So I went onto the pillowing.
one pillow, Bandanas from Hobby Lobby..

Two pillow- fabric I already had in my stash.

Third Pillow- outdoor fabric for 3 bucks
Fourth Pillow- a remnant piece I picked up for 2.50..

Last one a canvas piece that I already had- I printed out a Liberty bell and attached it to the front.  Also there is a copy of "America the Beautiful" sheet music.  And then I inked on with a sharpee LIBERTY..oh
and I took apart some old pillows to restuff with.
Come on FOURTH!
 

Monday, June 18, 2012

Valspar color sample in "Twilight Meadow"!

I have decided that I would like a new job. I want to name paint.  Yup, all those exotic colors that speak to me from slots in the Home Depot.  In all their arrayed glory, shade to shade and dark to light.  Oh, is enough to make me stop in my "hurry in and out" clothes that I don't ever want to be caught dead in.  But there I am in the paint swatch department, salivating like a little kid in the front of a bakery window.  But so far in my scanning of job descriptions, I have NEVER seen anyone asking for help to name paints.  I could do it for fingernail polish too...lipstick, the possibilities are endless.  "Begoinas Bemused" or "Frothy Hot Toddy" or what about"Whispering Wild Vanilla".


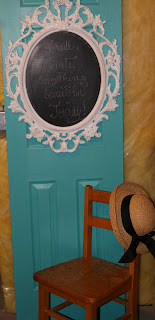
But for today, I will just paint these gorgeous colors on old furniture that I find at the thrift store.  I found this door at the DI and hauled it home...15 bucks.  It was the deal of the week.  Yes sir.
THere is that VALSPAR color sample jar...only $2.47 for 8 fl oz
of lovely "Twilight Meadow".  And the arm of my lovely
assistant, EMMA.

I had also picked up an IKEA mirror in the reject department and painted it white over the black that it once was.  (Probably "Midnight Madness" black!)
I removed the mirror and cut a piece of tag board for the inside  and painted that with chalkboard paint.


With a few brushes of sandpaper to give it that worn look, I reinserted the blackboard and flattened those little brad things and voile'.  A place to write clever stuff  and more yellow insulation covered up!

Monday, June 11, 2012

As Promised.

Awhile back my sister was visiting and she picked up a small glass goblet as we were shopping here and there. She showed me and said,"this would work on your yard pedestal."  I am sure I nodded "uh-huh".  But I really didn't have a clue what she was talking about.  But then it came up on PINTEREST one day and I said "UH-HUH!"  And the gathering began.

Most of us crafters out there love the gathering part.  We love to be on the "look out" for things to snatch up and feel victorious.  And I was fairly pleased that lots of my "gathering" for this project was in my own cuboard.
LOVE THAT!  But did it keep me from looking everywhere I went?  Uh, NO!

Now some of my "peeps" have requested that I would be a bit better with the Tutorials.  So this one that I will tell you what I did and then what I HAD TO DO and you can decide for yourself after doing great research on what kind of glue to get to bond glass to glass.  I thought I HAD done that and still didn't think it worked very well.  SO, you do your own looking and don't blame me...ha.
gather glass vessels and candlesticks and most importantly...
bud vases.  YES, BUD VASES. They are the first piece because they
are what you slide onto the copper pipe.  Get skinny ones....

clean them out real well and then let them dry completely.
Now comes the HARD/FUN part.  Decide what pieces to stack to make your pedestal.  I came up with oh, probably
100 ideas for each one.  It is very hard to decide.  And maybe I dropped a few and they broke and I said a 
 bad word.
Well, don't do that.
Now comes the tricky part.  Decide on what kind of blasted glue you are going to use.  I used LOCKTITE

outdoor glue and it worked pretty well.  I think I got into trouble when I began using E-6000 that says that it is made to bond glass...but don't believe it.
In the end I used my very hot glue gun and that baby never fails me.  And if I have to glue some back together then so be it.
Just don't stack all the sections on top of each other the same day.  ( cuz it might bring on more swear words...I am just sayin)

oh and see those little fluted ones just above here?
Those are from the dollar store...(disguised as candle holders.. I might have broke a few of those...)
Then you must decide if you are setting them on copper piping like here or a painted spindle or
a dowel you paint.  I opted for the copper tubes.  Shoulda got the thicker ones...just sayin.
so I had to punt.  (reason being that they are heavy when finished and none of my bud vases that are the base piece  (did I mention that?  WEll, they are the first layer...) were real skinny.  You see when you put them on...they want to flop a bit over to the side.  They look a bit wonky...so I punted.

I cut a piece of clear packaging in a circle and then slit the side and glued it into a cone.
Then I glued the cone on the pipe.
Then I heaped glue on the top of cone, thinking that it would stabilize the vase a bit.  It does-just a bit.
Then just quickly add each of the towers onto a rod.
Volie'

Monday, June 4, 2012

Bit of this...bit of that...

So all you fans out there....I am so sorry that I have been absent.  I know that you are waiting on pins and needles to see me back.  (Can you hear my sarcasm?)  But when I don't post, I feel sad because it means I haven't completed any projects of late.
But I do have a few things brewing....so here they are.
beautiful iris that remind me of home.

one of my first roses of the season....

custom watercolor that I am working on.....

a great new recipe from WW that tastes like quiche' and is only 3 pts*

A blessing dress I made for sweet new niece baby Sophia...
my new chevron skirt with royal sweater....
and the glass collection that is being glued as we speak....stay tuned!
A bit of this and that.  Gardening is sucking up lots of my day, but I LOVE IT!  SO, if you tune back later
and see nothing new...picture me in the garden.  There I will be with mud between my toes and pretty flowers sprouting all over...that's the plan.
See you in the garden!!