Sunday, February 10, 2013

On the subject of wings....

I am going to say it outloud.  I love angel wings.  And I decided that I would embrace this fully and make a pair!  I have seen more than a few here and there and I drew up plans and then dove in.
I  found that the "science fair " carboard to be 

an easy and good source of the base.  I penciled in the shape and cut it out.I also covered the brown part of the cardboard with white paper so it wouldn't show through.
I also bought a feather boa and Joanns with a coupon and spread it over the top section,  I would spread hot glue and press the feathers over it.  I found that using a wooden spoon was a great finger saver.
I found it easier to start at the bottom and move  towards the top.  It takes lots of feathers!

Then you repeat for the other wing and then attach with  a  square of cardboard covered with white paper and yes more feathers.
On the back I attached a hanger with hot glue, covered it with white paper and you guessed it...
more feathers!
Now I moved it into place and I am quite happy with it...
Here it is hung up and resting over me in my studio.  Love it!

Monday, February 4, 2013

Get to CLASS!

I was nervous.  I didn't sleep well the night before.  I checked my supplies  a thousand times.  I ate off my thumbnail..  Belle on the other hand was not nervous at all....
I put the supplies in cute pink bags and fired up my glue guns.

I had 5 ladies come and it was soon a mess of glue and glitter.....and I learned a few things...
Gladys has a bunion, Marvella barfed on a cruise, and Heddy wants a canoe for her birthday...
Ha..just kidding.  But you can see that chatting away is part-o-the-fun!
 Another uninvited guest was Stacey's calico who thinks this box I covered  is her spot...

there were treats and I think the Browned Butter Brownies with white chocolate were a hit....
a little leftover mess...sad that it is done...
 And soon it was over (3 1/2 later hours later...) Kids were calling their mommas, husbands were texting... but they all finished and I was so proud.
WAY TO GO CLASS!!

Wednesday, January 23, 2013

Introducing....

I am trying something new and exciting and a  bit scary.  Classes in my studio!  And not just RS friends coming over...this is the real thing.  3 hours of fun with refreshments,  All materials involved in the cost and take home a finished project!  So here are the details and if you are in the vicinity of South Jordan, UT. just  comment and I will get back to you with more instructions.  The first class will be held on the 31 of January which is next Thursday night. 7-10 pm.  Let me know if you are interested!
this is the announcement I sent to my email group....I still have a few spots left....
this is our first project....so cute don't you think?  And easier than you think...I will hold your hand...really.
cost...$28.00
email me.

Sunday, January 20, 2013

Flowers on a cold day..

Today someone that had seen my facebook post asked me if I was in a flower phase....I thought to myself-hmmm.  I have been in a "flower phase" for years now.  And when you give a mouse a cookie.  You have heard that....stay with me here.
I wanted to "clean up" my studio-I am a girl with much stuff.  And it does get to me that I have many boxes with little things of this and that.  So I resolved that during this cold dark winter, I would go through every drawer...(like that is gunna happen...)
Let us get back to the cookie.
I had a very nice recent sale of an original painting.  It gave me some freedom to get some new furniture for my studio space.  I found a cute piece on sale the day after Christmas and I snatched it up right up and drove it home in a blizzard with a quarter of it hanging out the back of my Explorer.  I also bought and installed feet on it and put the shelf unit onto the top.


So this created an empty space on the wall where the shelves had been...This becomes the "cookie" part!

I wanted to create a space that I could also use as a bulletin board and yet be artsy too.  So thus began the "flower" thought.  I got a few pieces of pine and constructed the frame myself so it would fit perfectly in the spot.  I got a handy dandy electric staple gun for Christmas and it made it simple.  Then I got a piece of board and painted it with MANY coats of MAGNETIC paint.  It is smelly and thick and made a real mess.  Then went the coat of white...
Then the FUN began....Oh, how red paint against that turquoise makes the heart lighter.  I was almost sad when it was finished.  But now it is done, these cheery poppies speak to me when I come into the room.
And when I put up a magnet, it held.  Now back to going through those drawers...ick.

Beady

One thing I do love about January.,,, ( did I really say those two words together?  LOVE and January?  I misspoke) there is plenty of time to do other things.  It has been cold and nasty here and the snow is still here.  Ah well, it has compelled me to get some little projects done that I had shelved way before Christmas.  I had seen some of the cute collars with beading and I thought I would tackle one of them.
I went online and found a peter pan style that I liked and printed it out. I then cut it out onto plain white blend and sewed it just like you would a collar to attach, leaving the straight end open.
I also interfaced it to give it some shape.
Now my mom is a beader...and my sister would have probably taken a few hours to hand bead those little puppies on...but not me.  I got out my Tacky glue- yeah that expensive one and started laying it out with stones and such.  I put on a Netflix movie and went to town...
I laid a string of beads right on the edge and I think it finished it off well.  I then made a "soup" of all the beads and pretties that I wanted.  I then put the glue down in a inch round and spread beads and then went on.  I had just enough to finish it.  Now on the unfinished edge I just glued a bit of satin ribbon and left enough to tie.  I then did a few tacking stitiches in the front to hold it together.
Add caption
I love it.  I have yet to wear it. But one of these days....

Friday, December 14, 2012

Sneaking out...you gotta go.

Since moving to the Utah, I have wanted to go to this fun boutique.  Even tried once but with all the traffic and construction, gave up.  But now it is found it will be forever on my list of  WONDERMENT, LOVELINESS, GIRLY, PINK, oh and just FABULOUS!  I signed up for a class to make a wreath...and my sweet husband even went to parents meeting for US.  After getting a bit lost...I found it!  Imagine-pink walls, pink chandeliers, dress forms and just delight at every glance.  And then getting to sit down and make something?  All "stuff" included.  BE STILL MY HEART!
The lady that taught the class is Margie Romney-Aslett and was so fun and funny and talented.  She works for Bazill and does these classes 2 or three a month.Margie Romney-Aslett.  She even had cute
copper-pink shoes on....loved that.

We opened up our bag of goodies and when to town.
They even had a goodie plate and ice water for us....SO COOL!!
I squished and pinched and glued and then went exploring in the amazing shop.


here is my wreath, in place at home...

It was soon time to go....but I will be back.  Oh yes.

Sunday, December 9, 2012

Gnomes, oh and Polka Dot Trees

To say that I go to Tai Pan a bit is a plain lie.  I go there plenty.  Doesn't help that it is only about 2 miles from my house.  Actually it does help.  I like it there.  My pocketbook, not so much.  (I digressssss.) They have amazing Christmas tree displays and I fell in love with a red bristle tree...but not the price.  So I decided that I would change my main tree colors to red and white this year.  I bought a couple of elves and had a great time picking up red ornaments along the way as I have shopped different places.  At Tai Pan they had these red/white cone trees and I ( as predicted) decided that I would make mine.
I began by buying green mercury glass bases for the dowel to sit in.  I poured plaster of paris over a bunch of packing peanuts and stablized the wooden dowel.
I picked up some very nice large sheets of medium weight cardboard from HObby Lobby and twisted them into cones and hot glued them shut.  On the base of the tree, I put a round of heavy cardboard for the cone to be glued to.
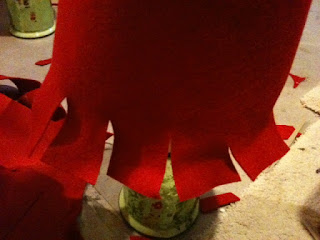


I glued it with gorilla glue so it would stay...Then I wrapped the red 
felt around it and hot glued it on.  The most fun part?  Attaching the pom poms.  Well and of course setting them near the fire place...

So then I saw that Gnomes are very in this Christmas and I wanted to make a few for my mantle.
I got out my remnants of red felt and then dug into my Thrift store box of sweaters and 
starting snipping away.  I made this little pair for one of Alicia's friends in KS and their bodies are made of toilet paper rolls. Ha, reuse -recycle!
I was way too cheap to buy styrofoam balls at 3 or 4 bucks a piece when they are TOTALLY underneath the hat...so I came upon my own devices.
 how about tin foil rolled up into a ball and smashed against the table?  Works like a charm.  Then I glued a bit of fleece to smooth it out.  Then I hot glued a piece of flesh colored felt on the outside, smoothing it out to make a face spot.
 I cut out the body of sweater to fit the body, which I made in various sizes from rolling cardboard in  lengths and widths to form a tube.  Then I glued on the sweater.  I rolled little tubes of sweater for the sleeves and glued them to the middle of each side with the raw edges folding over inside the tube. I then selected the beard from my plethora of furs and woolies.
I made the hat in a similar fashion to the cone trees.  Rolled up a piece of card stock to make a cone and fit it on the head -then covered it in sweater or felt.
I glued it all together and then added a wooden bead for the nose and black beads for the eyes.


A little rouge for the cheeks and they are done.....Gnomeville!  And here is a shot of them on the mantle and my Christmas reading bench....Gnomey.